Sunday, December 26, 2010

Post Holiday Bliss

Happy Boxing Day, folks! I hope you all had wonderful holidays filled with family and friends and general cheer. I certainly did and now we're enjoying the calm and lazy playfulness of the day after. It's windy and stormy outside. The fire is cozy. And Beckett's new play kitchen has been churning out world class fare all morning.
I'm sorry I went dark there in the days leading up to Christmas. I had, of course, planned on sharing all of my completed holiday projects, the cards and labels, the handmade gifts and wrapping, but as usual the holiday crunch caught up with me and mothandsparrow took a backseat.

My slacker posting schedule may end up for the best though, as now I have a few reserve projects stored up to share during this crazy month of packing and moving and excitement and nostalgic meltdowns. I'm officially leaving my sewing machine at the new place, so I'll be without it for most of January. I'm also officially leaving my husband at the new place. GULP. It'll be an interesting month, but probably not such a productive one.

For now I just want to say here's to you and yours. Wishing all the best the Winter holidays can bring and the best possible New Year.

Monday, December 20, 2010

Santa's Workshop

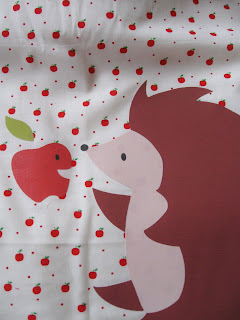
My niece, Ella, is into the baby doll thing. Or "creepy babies" as my sister calls them. The seemingly requisite pinks and lavenders of baby doll loot really don't jive with the red and green apple decor of Ella's bedroom. So I made her this doll bedding. There's a mattress cover, a pillow and a blanket.The hedgehog is an iron-on transfer. It's based on a design I did for Ella's nursery before she was born. The apple print is a Minny Muu design from a few years ago (it's actually left over from the nursery's curtains) and the quilt backing and pillow are red corduroy. The corduroy gives it a nice cozy weight and feel. I had an abundance of unused white fleece, so I substituted two layers of that for the batting. It's a little dense, but I'm all about using whatever I have. Saves a few dollars, and means there's less junk to move next month. Actually I didn't spend a dime on this project - it all came out of my absurd stash.While I'm sure Ella will love this, and will use it plenty, it's really a gift for my sister - to give her a break from the pinkie babyland. I just wish I could do something about those uncanny rubber faces.

Sunday, December 19, 2010

Peppermint Ribbon Corsage Tutorial

Making this little sweetie takes a few minutes more than the necklace. Maybe 12 instead of 10. It's still quick and simple and super fun to wear.

Materials
- 7/8" ribbon
- Felt
- 3/4" cover button kit
- Coordinating fabric - I used corduroy
- Hot glue gun

1- Follow the instructions on your cover button kit to cover 2 buttons with your coordinating fabrics.

2- Cut 2 felt circles one with a 1 1/4" diameter and one with a 1 3/4" diameter.

3- Take one felt circle and begin hot gluing the ribbon starting at the outside edge and spiraling in, pleating as you to follow the curve. Tuck in the raw ends. Repeat for the second felt circle.

4- Hot glue the covered buttons to the centers of your two ribbon flowers.

5- Cut a small strip of felt - about 1" x 2". Arrange the 2 flowers and hot glue their backs to the new felt strip.

6- I had a pin back lying around that I glued to the back, but you could just pin it to your shirt like a real corsage, or even sew it to your shirt, though I wouldn't count on it to wash well.

I hope you all enjoy these quickie projects. Please give them a try, it's a low input- high yield kind of thing. They're quite cute together and of course they don't have to be holiday themed. Have fun!

Peppermint Holiday Necklace Tutorial

This whole projects takes only a few minutes. It goes perfectly with a dress or a chic cardigan or any number of cheesy holiday accessories - think antlers and santa hats.

Materials Needed

-Red and white striped ribbon - 7/8" wide
-5 - 3/4" unfinished wood beads
-Red craft paint
-Bamboo skewers

1 - Paint the wood beads using craft paint. I like to string them on a bamboo skewer for this step so I don't leave finger prints all over them.

2- Cut a 52" length of ribbon. Trim one end at a sharp angle to thread through the beads.

3- String the first bead about 30" down the ribbon. Push the end of the ribbon into the hole in the bead, then use the bamboo skewer to push it the rest of the way through.

4- Tie a knot and push it right up against the bead. String the other 4 beads, tying knots in between. I didn't put knots on the outsides, so there are 5 beads and 4 knots.

5- Even up the ends and trim off any excess ribbon, cutting the ends at 45 degree angles.

There's still plenty of time to make this for any upcoming holiday festivities. I'll get the tutorial for the corsage up in a minute. I hope you enjoy!

Saturday, December 18, 2010

Jingle Belles

I went out with my girlfriends for a little holiday fun. We donned our gay apparel like nobody's business, and as usual managed to go through the entire evening without snapping a single photo. Oops. I whipped up these little accessories to go with my santa hat and my red belt and heels. It only took me a few minutes, some peppermint stripe ribbon and some crafty bits I had around the house (cover buttons, wood beads, felt and hot glue). I'll work on a tutorial for tomorrow!

Tuesday, December 14, 2010

There Are Places I Remember...

So the big big news around here is that we're moving. We'll be leaving my beloved Bellingham for greener professional pastures at the end of next month. Even then they might have to drag me away. I'm picturing the new tenants peering wonderingly at the claw marks in the floor leading down the front stairs.

In all seriousness I'm excited for the adventure and reinvention of moving, not to mention the thrill of decorating a new place, but I've lived so much in this apartment. It was our first place together as a young couple. I became a wife while living here and a mother twice over. I became a gardener here. Started avidly sewing here. I mourned my Jasper cat here. My first born said his first words and took his first steps here. It's a lot to say goodbye to.

It's not as if these memories have irretrievably seeped into the walls, but I've already had a few weepy moments and I'm sure there will be more to come. Please pardon any sap that may ooze out over the next few weeks, I'm full of nostalgia and sentiment, and pardon any gaps in posting. I'll do my best to keep up, but apart from holiday festivities and gift making and packing and caring for my kids, I'm trying to really enjoy all that Bellingham has to offer.

Monday, December 13, 2010

Oh Christmas Tree

I'm having the most marvelous Holiday season. This time last year I was dehydrated, couldn't keep anything down, rapidly losing weight, and medicated with some garbage that would knock me unconscious for hours at a time. Not exactly the merry little elf I like to be. This year though, I'm fully myself and filled with even more obnoxious joy over getting to play Santa for my 2 boys. I'm overflowing.

This weekend we got a perfectly imperfect tree at a place called Tom's U-Cut, up here in Bellingham. Wonderful people, beautiful trees, very reasonable prices. We decorated and drank hot cocoa, then rode the bus to go see Santa and take a lovely jingle bell laden carriage ride.

I try not to go in for the whole corny deal, and I certainly abstain from the ugly retail frenzy that Christmas usually brings, but I'm a sucker for the trees and the lights and the magic of it all.

Thursday, December 9, 2010

Eat at Andy's

My dad is a fantastic cook. Everything he makes is delicious but, as his daughters and sons-in-law can attest, his specialty is breakfast. Nobody fries an egg like my dad. And he loves nothing more than playing short order cook to friends and family who visit. He also loves crows. No matter how many humans he might be entertaining, his backyard friends are always fed first. And it shows, the crows in his trees are sleeker and shinier than any others I've seen.

For Christmas I wanted to make him a sign that said "Andy's Diner" or "Buddy's Bed & Breakfast" or something. I was going for a sort of old timey look and I wanted "crow" in the name. I had a ridiculously hard time thinking of something suitable. Andy's Eatin' Crow Cafe? Ew. No. But it all came together. I made it using this really cool wood transfer technique. Mine didn't come out as cleanly as I had expected, but I'm ok with it. It makes it look vintage. I can't wait to give this to my dad. He's going to love it.

Sunday, December 5, 2010

Shawl Pins

I did it! I actually made the shawl pins I mentioned in my previous post. I'm always looking for excuses to pull out my Sculpey stash. I get a ridiculous buzz from making these tiny figures. I always have. But how many wee statues does one house need? Luckily, tis the season for scarves and shawls. So I made these.Of course I made my go-to favorites, a fox and a couple of owls, but I played with some new things too, with certain people in mind. A bunny and a cat for my sisters. A lion and a toadstool for my good friends. A squirrel for my mom.
And, just for me (and for the look on Beckett's face) a stout little walrus, tusks and all. I'm going to put him through some quality control testing and if he withstands it, these will be the perfect little somethings extra to go with my holiday gifts.

Thursday, December 2, 2010

Woven Scarf

I finished a scarf on my little vintage play loom and I'm so happy with how it turned out. I haven't woven anything in about 5 years and never a scarf. The weave makes it less bouncy than a knit scarf (just like woven fabric vs knits) but it lends it a certain elegance. It's unique too, and right up my mom's alley. I love handmade holiday giving, especially when the supplies came from my wonderful local yarn shop. Take that Joann!I used 3 different blue yarns to give the color a little dimension, a solid blue worsted weight wool, a wool tweed and a navy lace weight alpaca. I used all 3 in the warp, and used just the solid blue for the weft. I'm so glad I took the time, it would have looked pretty flat in one solid yarn. For any of you interested in weaving but not so interested in investing in a loom, there are many tutorials for DIY looms on the web. Or you could just put some nails into 2 bits of wood, clamp them to the ends of a long table and go to town.I'm pretty fired up about this, it's much quicker than knitting, which suits my current life situation, and it could be just the thing to help me burn through my excessive yarn stash. Also I'm thinking about making some shawl pins. Don't you think this scarf would be nice paired with an owl shawl pin?