Tuesday, October 5, 2010

In the Meantime- Tutorial on Sewing Ribbing

We might as well take advantage of the technical difficulties, so while we wait for the animal hats pattern, how about a down and dirty tutorial on ribbing?

First of all, let me reiterate that I have a very basic sewing machine and therefore I use a basic zig zag stitch when working with knits. I hope to someday own a serger, and on that day I anticipate many tears of joy. But until then, I zig zag. Those of you who have a serger, an overlock machine or one with a stretch stitch, use it!

Next I should say that I leave the edges of my ribbing raw. I know it's not the most high brow way to do things, but it doesn't fray or unravel and it makes it softer. And as long as you cut it cleanly it looks great.

-Wash and dry your ribbed knit fabric (available at most fabric stores.) It comes in pretty great colors so have fun with it.
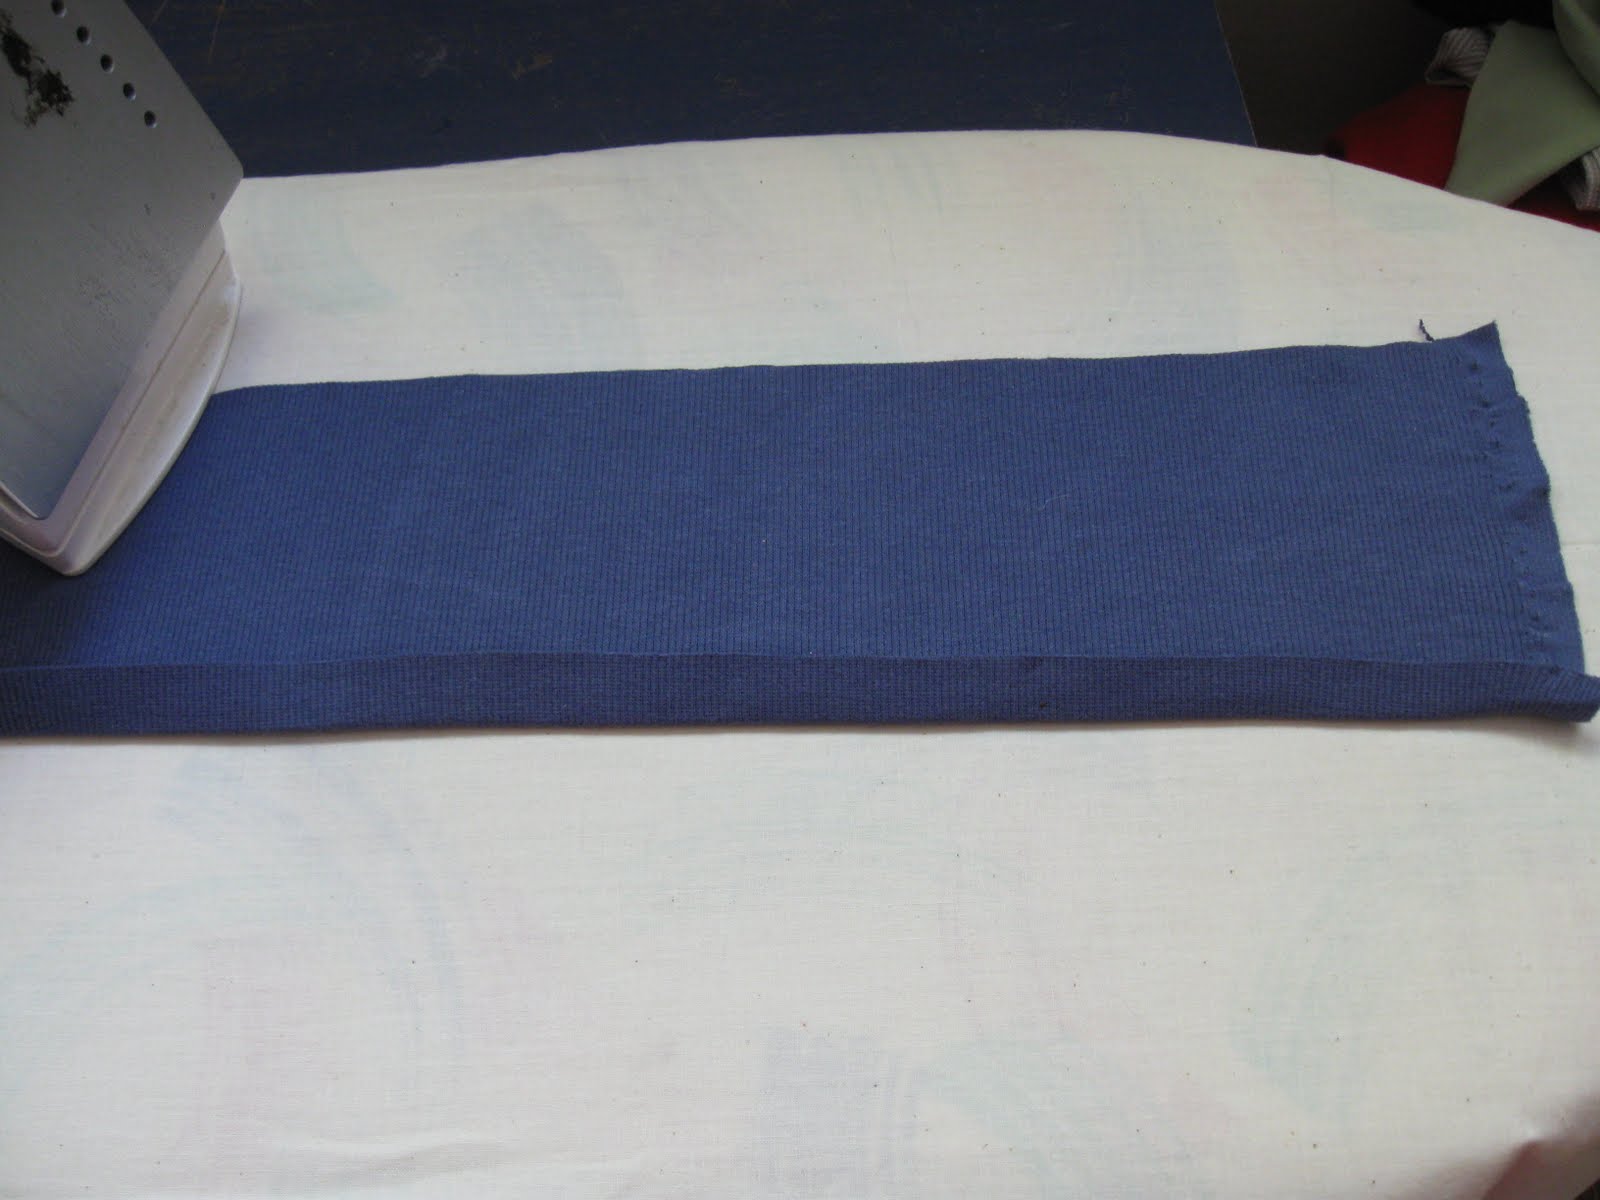
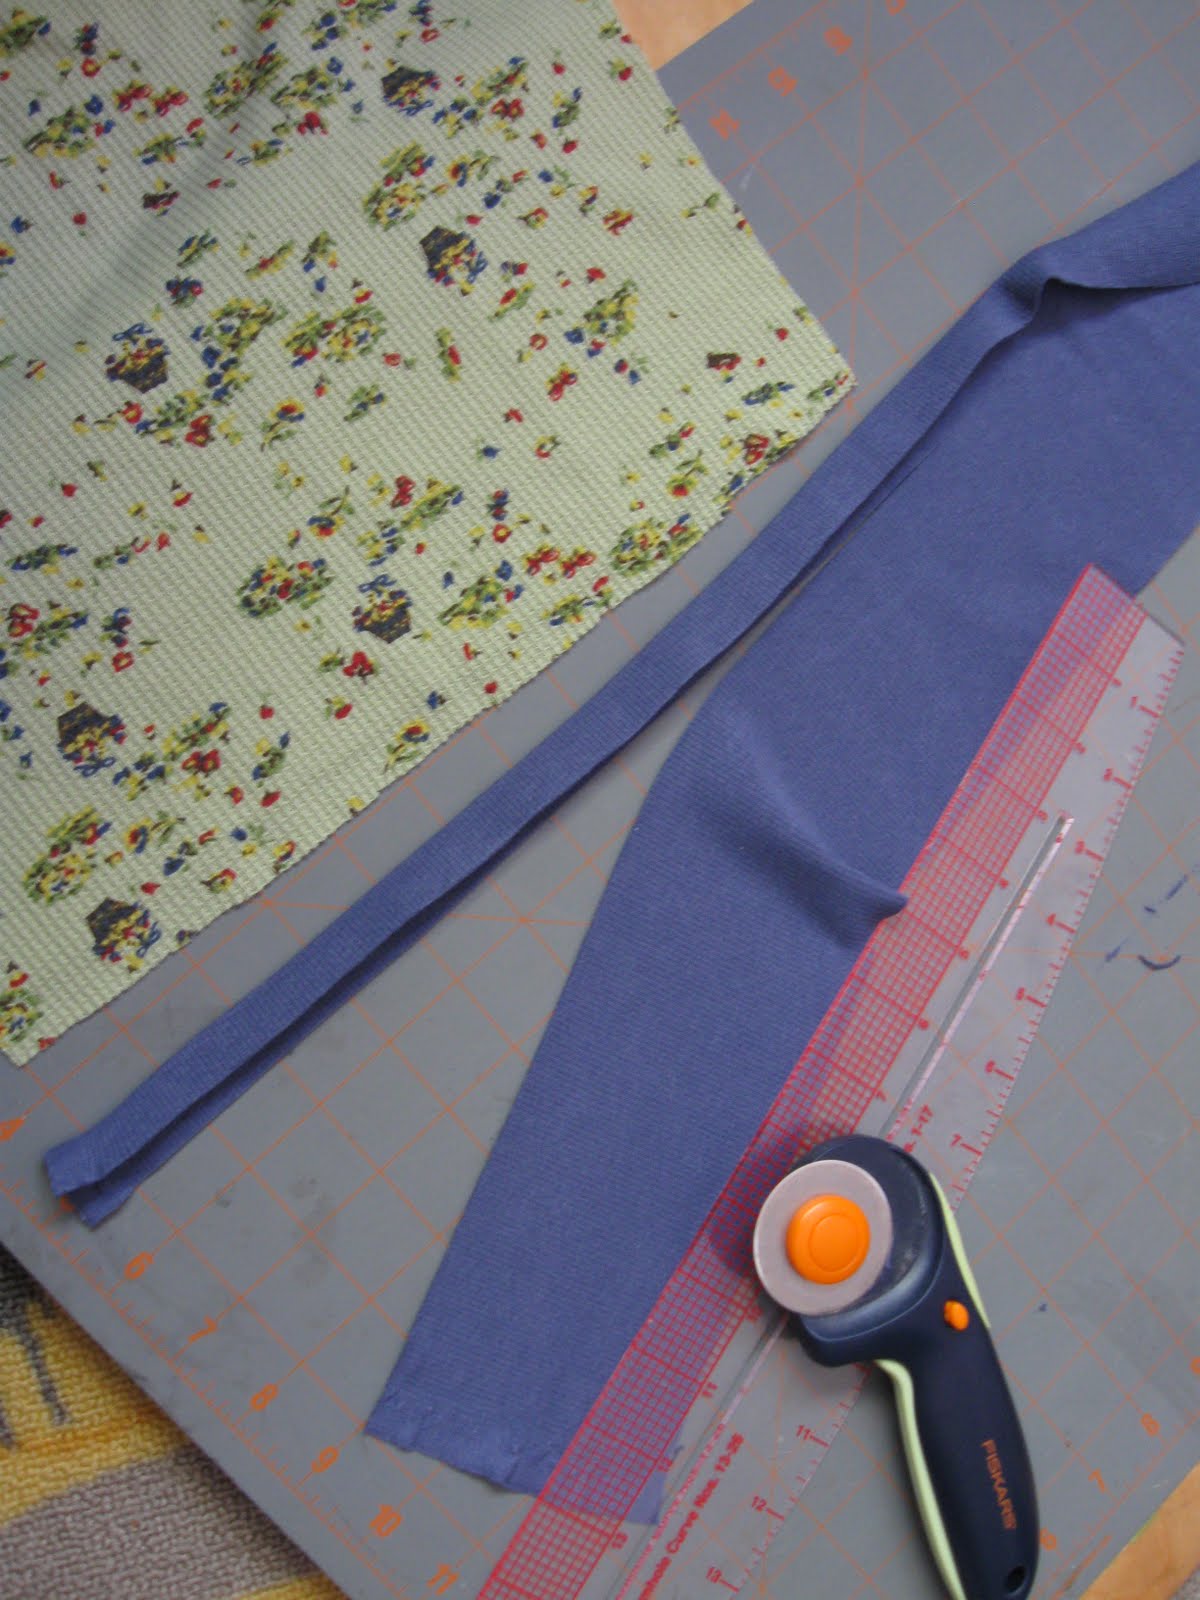
-If your cutting counter professional's cut leaves something to be desired use sharp scissors or a sharp rotary cutter to clean up the edge.-Place your ribbed knit on your ironing surface, right side down. Fold up one edge to the width you'd like for your trim. Press.-Next cut the back of the trim about 1/16" wider than the front. I usually lay my pattern piece (in this case, a sleeve) out next to it and eyeball the length I'll need so I don't cut too much ribbing.-Cut the length you need. Ribbed trim needs to be stretched tight so it needs to be shorter than the edge you're sewing it to. Some people cut the ribbing to 2/3 or 3/4 of the total length. I cut the whole length because it gives me the freedom to choose how tightly I want to stretch it. It's a little wasteful, as you end up with a little scrap to cut off, but it doesn't keep me up at night.-Unfold your ribbing, put the edge of your garment inside, and refold. Pin one end.-Time to sew. Put the pinned end under your presser foot, make a few stitches and backstitch. Then pull the ribbing toward you, being careful to keep the garment fabric well inside the ribbed trim. How tight you pull determines the tightness of the trim. Too loose looks sloppy, too tight is uncomfortable and bunches.-Zig zag stitch about 1/16" from the top edge of the ribbing. Backstitch at the end and cut off the extra trim.-Done and done. I hope this helps, I'm pretty awkward at writing tutorials, so if anything needs clarification or expansion please leave a comment and I'll happily fix it/ get back to you.
Monday, October 4, 2010

Baby Hat Menagerie in Limbo

We're experiencing technical difficulties around here. So typical. Our scanner kicked the bucket and a new one is being shipped as I write. The baby animal hat tutorial is going to have to wait for a few more days. Bear with me, I'm working on it! Sorry for the delay folks, and thanks so much for your interest!

Moomin Mania

We're in the throes of full blown Moomin fever around here. These stories and characters, by Tove Jansson, are absolutely marvelous. Full of Scandinavian humor and wonder and a slight bent toward Scandinavian melancholy. It suits us brooding Brewers just right. The Finn Family Moomintroll has officially become Beckett's first one-chapter-a-night book. It's fantastic. I have such strong, lovely memories of my dad reading James and the Giant Peach and Charlie and the Chocolate Factory to me in this way. And it's even better on the parental end. Man, my life is good.
All of the great illustrations, and whimsical places are giving me a strong urge to Moomin-out the playroom.

Friday, October 1, 2010

Happy Birthday

Lemon raspberry cupcakes with cream cheese frosting, birthday pasta salad and a weekend with friends and family in Seattle. Happy Birthday, to the foxiest darn "Daddus" around.

Thursday, September 30, 2010

5 and 6 Down, 1 to Go!!!

Here's the boatneck tee from my list. I'm not going to lie to you, it's longer and more shapeless than it was in my head. It would take me all of 15 minutes to chop off a few inches from the bottom and take in the sides to get that classic boatneck look, but I'm actually completely enamored with this shirt. It's easily the most comfortable thing I own. It's soft, lightweight and breezy. The "mistakes" I made are what make it, in my opinion, more interesting. I've barely taken it off since I finished it. And I'm about to throw on my skinny jeans and take it out for an errand running spin.

Next up is my wide leg trousers. This project is hit and miss. It's my first attempt at adult pants. I made the pattern by tracing another pair of well loved pants and widening the legs. I think the legs are a smidge too wide and the crotch is a tiny bit too shallow. On top of those issues, the seersucker fabric has a strange, almost waterproof-y, texture to it. It sounds weird when I walk. I hate that. Plus they photograph really badly. Boo!Despite all of this, I've worn them quite a bit. Even out of the house. So they can't be all that bad, right? I'm so thrilled that Kid's Clothes Week forced me to make nice with ribbing. I learned so much. The waistband of these pants is 2" wide elastic encased in ribbing, and it's definitely my favorite part. I'm thinking I'll tweak this pattern, try to work out the kinks, and try it again on some interlock knit fabric.

Speaking of interlock knit, I really want to make myself an Acorn Hunting Hoodie. But that would mean buying fabric, so it'll have to wait until I'm finished with my last project - the thermal tee, which is actually no longer a tee, but it is still thermal, so it counts.

Tuesday, September 28, 2010

KCWC - All Stitched Up

Here's my completed pile from Kids Clothes Week. Pretty stout, right? There are a few things I haven't posted yet, like a few iron on transfers from this, which I've been coveting. Unfortunately I'm no iron on expert. I'll definitely be practicing a bit before I dig into these awesome images again. Anyway, it was a fantastic week. Productive and fun. I got tired of switching out the thread and bobbin, so I ended up just using teal thread for the bulk of the sewing. It, plus the fact that I worked from a few cuts of stashed fabric, makes it seem so cohesive. I kinda love it. It's like the Brewer Fall 2010 collection. Except not fashionable.
There's already some talk of a Spring Kid's Clothes Week next year. I'm so in. And stay tuned, because in the midst of my kid and baby sewing frenzy, I somehow worked on my own list too. I'm so close I can almost smell the new fabric!

***UPDATE*** Check out the newest post over at Elsie Marley. My animal hats were picked for the big wrap up post. Also check it out because of the other amazing creations. There's a lion jacket that is just killing me! Anyway a few people have asked for a pattern for the hats - so I'll try to post a tutorial after this weekend. Wish me luck! And thanks so much to all of you who have shown an interest!

Monday, September 27, 2010

Junecraft!!!

Check this out! Meg of Elsie Marley, creator and hostess with the mostess (mostest?) of the Kid's Clothes Week Challenge had daily giveaways for the aforementioned week. I only entered the running for the last one (lots of them were either patterns - awesome, but a major fail waiting to happen for me - and/or geared toward girls - not relevant to my little world.) And I won! It's a gift certificate to this super mod etsy shop, Junecraft! Check it out, the designs are brilliant. And clearly this little guy is dying to grace the walls of the Brewer home. Right?

Saturday, September 25, 2010

KCWC - The Acorn Hunting Hoodie

Another something for my big boy. It's made from cotton interlock knit, with brown ribbing and a generous kangaroo pocket to fill with the hundreds of acorns we amass each time we leave the house. I just traced another sweatshirt he has, doing my best to eyeball the sleeves and armholes. It worked out surprisingly well. As has this whole Kid's Clothes Week Challenge. It's my first ever sew-along or challenge or whatevs and I've been crazy motivated. I dig it.

Friday, September 24, 2010

KCWC - For My Big Boy and Freezer Paper Madness

Can you tell what fabrics I had a surplus of? This whole Kid's Clothes Week Challenge has been huge for the great fabric de-stash. My drawers are no longer groaning under the weight, or refusing to close under the bulk. Anyway, here's a quick couple of somethings I made for Beckett. A raglan baseball tee and a pair of knit pants. I asked what he wanted to stencil on the shirt - no great surprise - he wanted a fox, but, and here's the great suprise, he wanted his baby brother to have a fox shirt too. So out came the trusty freezer paper and x-acto and soon the boys had matching pjs. Pretty damn cute, if I do say so myself.
I also took the opportunity, while the house was a stenciling disaster zone, to print these two mustachioed characters that have been lurking in my sketchbook. Ever since our little 18 month old Beckett was fascinated/ terrified by the walruses at the zoo, mustaches have been a favorite comedic device around here. These onesies cracked him up, and now he wants his own walrus and "Major Monocle" tee shirts. Of course he'll get 'em, but the cheese factor of having brothers with matching wardrobes is not lost on me. At least I haven't gone completely off the deep end and started making coordinating looks for myself. Or better yet, their tall, dark and brooding dad. Actually he'd probably love a Major Monocle shirt. Ok... you win this time, Cheese...

Thursday, September 23, 2010

KCWC - Animal Hats

These are a little big for the baby as of now, but not by much and not for long. One of these may stem into a Halloween costume? Calder was a slightly more cooperative model, but only slightly. Besides, the hats are too big, so they look a little silly on him. Still... pretty darn cute.Now, despite the pile of cut and ready to sew baby things, and the stack of cut and ready to go onesie stencils, I'm going to spend today working on something(s) for my big boy.